
KEELBAND REPLACEMENT by Andrew Cleare DD26
KEELBAND REPLACEMENT by Andrew Cleare DD26
In October I replaced the keelbands on DD26 having first studied Simon Moffat’s very useful and encouraging article in the Spring 1994 Newsletter. May I add a few tips from my own experience. Unlike Simon my only help was my octagonarian father-in-law who is not at the peak of fitness. I did have the contents of his garage/workshop available at Eynsham near Oxford.
I first removed the centreplate cover and thwart and tried to remove the centreplate with the aid of shearlegs and a pulley system. The pulleys were shackled to the plate’s lifting lug. They fouled the cuddy so I tried a webbing strop round the bottom tip of the plate, up through the c/b case slot and on to the pulleys. No amount of lifting and wriggling would persuade the plate to cone free of its pivot bolt. Finally the strop slipped and jammed in the slot. The plate was going to stay in place! The thwart went back in. The webbing was extracted later with the boat rolled over. (I will republish the plate lifting article in the Autumn issue. Ed.)
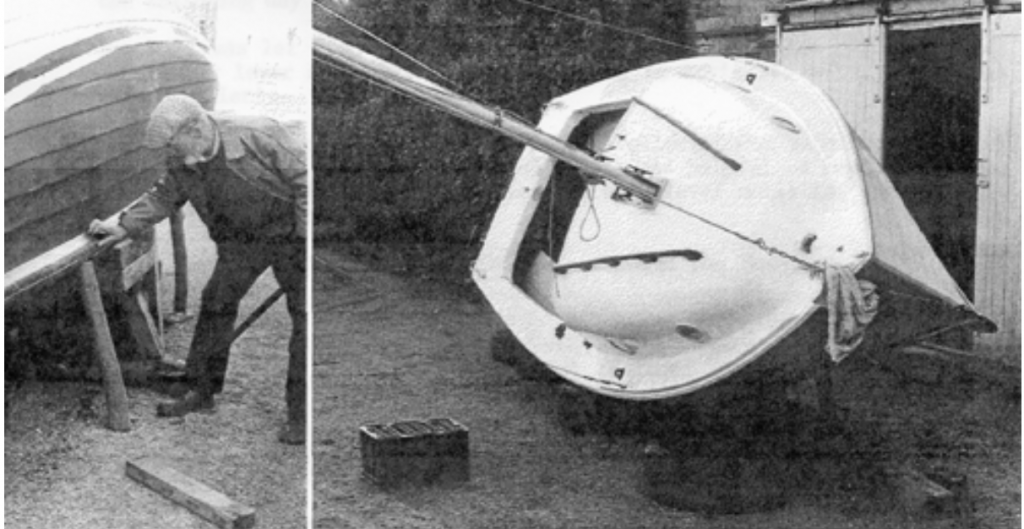
The next job was getting the boat off the Bamber trailer and on to the waiting tyres. The rollers on the trailer were in a poor state and did not want to roll. A handy 5 ft length of 4 x 2 solved the problem. I used it as a lever between the keel and the trailer spine. I levered the keel up and then backwards a couple of inches at a time. The process slewed the boat sideways on the rollers so I had to change sides every six inches or so.
With the boat resting on the tyres it was time to roll it over. When Nelson wanted to careen the hull of a boat on the beach he would have it rolled over by pulling on ropes rigged from the roasts, so why not do the same with a Devon Dayboat? I rigged the mast and tried pulling sideways on the main halyard. The boat healed, but it was a hard pull and the mast top was starting to bend. The “top down” method was looking doubtful so “bottom up” was tried instead. The handy 5 ft length of timber was used to lever up the hull on one side and props used to take the load when the lever was being repositioned. Successive leverings brought the keel to level that we could use a hydraulic jack. The jack enabled the hull to be healed to about 65 degrees. Three props now took the load, we tried adding more props but this only tended to loosen the others. Lastly we tied the main halyard to a heavy garden roller, just in case!
Getting the screws out of the old keel band was a bit of a game. The routine settled down to poking out the rust from between the keelband and rubber collars of the Rawlnuts. Safety specs and a stool to sit on made this job much more tolerable. Next the areas round the screw heads and the slots were scraped and the band tapped with a hammer to free the heads from the band. Penetrating oil seemed ineffective. Once free the screws came out easily. The trick for the old nuts was to put a screw back in for a few threads and tap with a hammer to free it. Undo the screw and it will push the nut into the bilge. One nut did not go through. It was the top one on the bow band. I had to drill it out. Behind it there is a piece of iron built into the hull.
Now is the time to remove the old nuts from the bilges with a length of bent wire. If you leave them until after the new nuts are in place these will get in the way of removing the old ones.
The next job was bending the new bands to fit the keel and marking them from the holes in the keel, both proved straight forward. Holding the length of bent half round brass for centre punching and drilling was a bit awkward even with the aid of a vice.
Fitting was easy using liberal doses of Vaseline on the new Rawlnuts inside and out. ALL has since proved water tight. The Rawlnuts were easy to find in our local ironmongers/builders merchant, but the M5 x 30am stainless steel counter sunk headed screws needed a phone-around the engineers suppliers in the Yellow Pages
(also try local boat chandlers). I decided to put silicone bath sealer as a cushion/filler between the new band and the keel to fill the inevitable gap caused by the rubber collars on the Rawlnuts. Not a good idea as it turned out, as most of it got squeezed out the following day as the boat came tip over the rollers onto the trailer!
The hull was let down again without any problems rising the hydraulic jack and timber lever as before – not forgetting to untie the halyard from the garden roller!
The trailer was given a new set of rubber rollers (more Vaseline) and this made winching the boat back on a doddle. It was helpful to keep a big tyre under each side of the stern to keep the boat level until the trailer side supports took over.
Note: Rawlnuts (M5 x 30) are available through the Homebase chain of DIY stores.
[Note from the current Editor (Jan 2004) Since this article was written, things have moved on a bit. Whilst it is quite feasible to cant the boat over in the way described, owners would find it easier if the centre plate is first removed and the boat then dropped off its trailer onto tyres. Rig the main mast, with a strong warp secured around the hounds. It is a simple matter then for one person to pull the boat over with the warp to tilt the boat on its side. Tie off the warp to something fixed or pin down the mast so the boat cannot spring back. Always put in place secondary props under the keel of the tilted boat as an added safety measure should for any reason something fail with pinning the mast down.
Rawlnuts are still available at specialist hardware / fixings centres but it may be necessary to order a batch. They are not available any longer at Homebase. – Ed]